

Sky Pond Trail Complete Guide: What to Know + Optional Lake Haiyaha & Emerald Lake Loop Add-Ons
When I lived in Colorado as a digital nomad, a curious thing happened—I took on the personality of those who live there. By that I mean I woke up at the crack of dawn to go hiking. If you’re going to hike the Sky Pond trail, I recommend you also get an early start because whether you choose the standard Sky Pond route or the extended version with Lake Haiyaha and the Emerald Lake Loop, it’s a full-day adventure at roughly 8–11 miles.
I chose to combine the Sky Pond hike with Lake Haiyaha and the Emerald Lake Loop because Sky Pond and Lake Haiyaha were my top two must-sees in RMNP, and because I’m all about efficiency, I figured why not squeeze in eight (!) alpine lakes in one day.
Now you don’t have to do Lake Haiyaha and the Emerald Lake loop. The standard Sky Pond hike is plenty challenging (and plenty gorgeous, too). But if you have limited time in RMNP, I’d say do it all. Either way, Sky Pond is one of the best hikes in RMNP (and my personal favorite of all time!).
So, whether you’re looking for a “one and done” hike in Rocky Mountain National Park or simply want a challenging hike with beautiful views, Sky Pond is the perfect option. On the standard route, you’ll see the iconic Sky Pond, waterfalls, Lake of Glass, and The Loch (one of the prettiest lakes I’ve ever seen). Or, if you’re up for an extra challenge, you can add on Lake Haiyaha (the famous green Instagram lake) and the Emerald Lake Loop for 5 more alpine lakes!
Plus, the whole hike is just damn pleasant. Though it was challenging in spots, at no point did I get that “I’m going to die” feeling that I often get on steep hikes.
So lace up your hiking shoes and let’s go!
No time to read now? Pin this post for later!
what to know before hiking the sky pond trail
You need reservations if you’re doing this trail between May and October, and I highly recommend that you do because conditions will be icy in the off-season. Get reservations here. Be sure to select “Timed entry plus Bear Lake Road.”
Arrive early because of parking and thunderstorms. Get there earlier than you think you should. Parking is at either Bear Lake lot or Glacier Gorge lot, and both fill up fast. Bear Lake is a much larger lot, but it’s also the starting point for many of the park’s most popular hikes, so get there early.
Also, during the summer months, thunderstorms happen in the afternoon. I did this hike in early October, so I didn’t have to worry about the storms, but if you’re going in the summer, you’ll want to be finished by the time the thunderstorms hit.
Take the shuttle if you’re arriving later. Again, I don’t recommend arriving later in the summer months, but there is a shuttle in Estes Park for hikers should you need it.
What to bring
Hiking backpack. My favorite is this one in the Adobe color from Adventurist. It’s the perfect size for day hikes, is super comfy, and comes in gorgeous colors.
Hiking shoes, preferably boots. An absolute must.
Spikes or crampons. If you’re hiking in July, you probably won’t need them. But – spoiler – you have to climb a freaking WATERFALL for this hike, and conditions can get icy. I managed to do this hike in early October without spikes of any kind, but I would have felt better if I’d had them because it was slipppery! So it’s best to have them.
Plenty of water
Layers of clothing. It gets chilly (and windy) up top, so you’ll want to prepare. Bring a hat, gloves, jacket, and long-sleeve layers. I always like to bring extra socks too.
Hiking snacks and lunch for your picnic at the top. Enjoy the gorgeous view of Sky Pond!
Sky Pond Hike Stats
Distance:
- Standard Sky Pond Trail (out-and-back): ~8-9 miles, depending on where you start
- With optional Lake Haiyaha & Emerald Lake add-ons (loop): ~11 miles
Highest elevation: 10,880 feet at Sky Pond
Elevation gain ~1,774 feet
Difficulty: Moderate to Hard
Duration: ~8 hours for me doing the full hike with Lake Haiyaha and Emerald Lake. It can definitely be done quicker, but I’ve never hiked for time. I’m a meanderer, personally. If you’re doing the standard Sky Pond route, your time will be a couple of hours shorter.
Route type:
- Standard Sky Pond Route – Out and back
- With Lake Haiyaha and Emerald Lake – Loop
Dog friendly? No, none of the hikes at RMNP are dog-friendly
Trailhead Location:
- Standard Sky Pond Route – Glacier Gorge Trailhead Map OR Bear Lake Parking Lot Map. Parking at Glacier Gorge will save you about .4 miles, but it’s a smaller lot.
- For the full hike with Emerald Lake Loop and Lake Haiyaha, you’ll want to start at Bear Lake Lot.
Parking: Bear Lake or Glacier Gorge lots
The Hiking Experience
This was my favorite hike ever. And I did a lot of hiking in Colorado, including a thirteener. It was pleasant with just the right amount of challenge and an out-of-this-world view at Sky Pond.
And it didn’t feel like climbing until I was a good way into the trail and then boom—the climbing happened all at once. The first part of the trail is almost a leisurely stroll with very little steep incline. It’s not until shortly before the waterfall climb that the steepness hits.

Ta-daaa~ Your first waterfall of the day! Not the one you’ll be climbing later. That one’s much bigger.
The trailhead to Alberta Falls
From the Bear Lake parking lot, start at the Bear Lake Trailhead and follow signs for Alberta Falls, your first waterfall of the day. If starting at Glacier Gorge Trailhead, do the same.

Enjoying the views…

A nice couple stopped and took my picture at The Loch.
The Loch
Once you’ve reached Alberta Falls, you’ll make your way to The Loch, an absolutely gorgeous lake. You’ll want to spend some time there.
The trail to The Loch isn’t too steep and has plenty of beautiful views. You’ll come across a couple of trail junctions, including one for Lake Haiyaha, which you’ll see later if you choose the extended route. For now, follow signs for Loch Vale.
When I did this hike, I had this lake all to myself for a while, until a lovely couple stopped by and took my picture. Controversial opinion: in terms of beautiful lakes, The Loch is on par with Sky Pond itself. Don’t tell Sky Pond I said that…
The Real Climbing Starts
After The Loch, just keep on truckin’ through the trail. Eventually, you’ll hit a point where the leisurely strolling ends and it’s time to climb! A.k.a. when shit gets real.
You’ll come to some rocky terrain that you climb like stairs. It’s steep, and I recommend you take a break before tackling it. Right before the climb is a popular break spot, perfect for having a snack or talking to some fellow hikers.
I watched a couple descend from the climb and then start talking to a man sitting near me, who happened to have on a bright green shirt (important later). This was no ordinary couple–they were on a week-long adventure doing hikes this all over the state, and from the looks of them, did things like this all the time.
The man sitting by me brought up Long’s Peak, a popular fourteener (14,000 ft elevation) that looks dangerous in YouTube videos.
“Oh yeah, maybe we’ll do that one tomorrow,” the man said. Like he’d just been recommended an amusement park instead of a strenuous hike. Where were the weeks of preparation?
When I was ready to tackle the climb, I got started. The higher I got, the steeper it got, but overall it wasn’t too bad and was pretty fun! And if you look behind you, you’ll get more great views!

Like this one!
Once you’re past the rock stairs, you’ve got more climbing to do. You’ve officially reached Timberline Falls, and you have to climb up it.
Luckily, there’s an arrow pointing where to go because to me, it didn’t look like I was supposed to go there…

This. This is it. The waterfall you have to scramble up.
I took one look at it and said “That? I’m supposed to go up that?”
On busy days, there may be a line of people waiting to go up, but that was not my experience.
There was a woman behind me who’d worn regular shoes and decided not to chance it. Good call.
After pausing for a bit, I decided to go ahead. There are a lot of hand and foot holds along the way. I never felt like I was about to fall and go hurtling off the side of the mountain (which has never happened, I looked it up), but it was slippery and icy. I recommend spikes just in case.

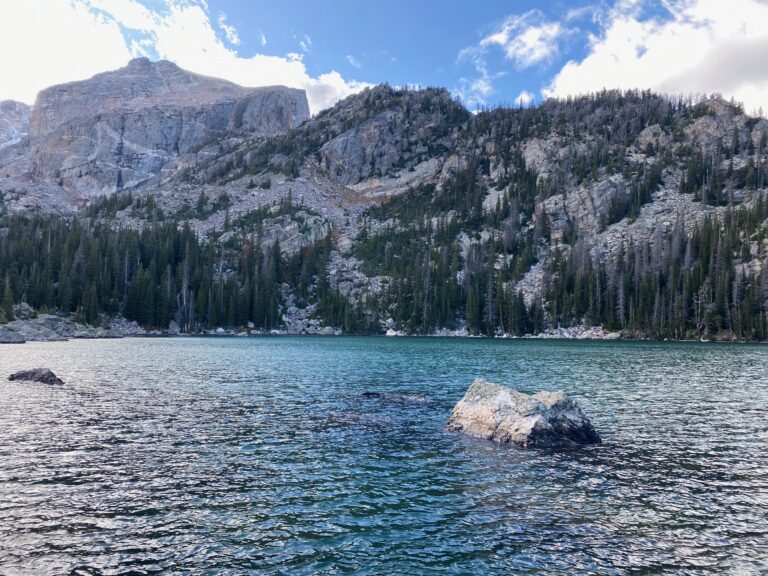
Lake of Glass
And once you get up the waterfall, you’ve reached your second lake of the day, Lake of Glass! This is NOT Sky Pond. I repeat, NOT Sky Pond! Some folks believe they’ve made it to Sky Pond once they get up the waterfall, but that’s not the case, and there wasn’t clear signage.
Unfortunately I didn’t spend much time at Lake of Glass. After the waterfall climbing and knowing that I’d made it past the hardest part, I was anxious to get to Sky Pond. Plus, it was starting to get windy by that point and it felt better to keep moving.
Sky Pond Trail
At Lake of Glass, to your right, there will be large rocks, and it’s your job to climb over them. It won’t be pretty or graceful, and you’ll have no idea where you’re going at first (there’s no trail), but eventually you will reach a trail.
It may take some trial and error to find the trail. Because it wasn’t marked, I went the wrong way at first. What steered me right was spotting the fellow from earlier who’d had on the bright green shirt. This is a popular hike, so chances are, you’ll find someone who knows where they’re going if you end up going the wrong way.

But with views like this, who can complain…
Once I got on the trail, I was set. I hiked a little more, and then…

Those rocks…
Sky Pond
First, you’ll see those iconic spiky rocks, and you know you’re at Sky Pond. And it’s every bit worth the effort you’ve just put in.
It was a surreal feeling for me. Maybe experienced hikers who do this all the time just see it as another conquest, but for me, it felt really special. I felt proud that I’d come so far to see a lake that what feels like few people have seen (I know, I know, it’s a popular hike. but it’s so remote. It’s pristine. And humans haven’t ruined it.).

Sit and enjoy for as long as you’d like, and be sure to look at allll the angles. It was super windy for me, and by that point, I’d put on all the layers I’d brought. It was freezing, but I sat and enjoyed a sandwich anyway. Some little chipmunks (even way up here!) came up to me, and it was tempting to feed them, but it’s important not to.

I would have sat there all day and stared at that water and the spiky rocks if I could have, contemplating life and everything else, but I knew I had to get back.
Before the descent, I caught up with the guy from earlier who had on the bright green shirt and let him know his shirt was the beacon that had guided me to the correct trail. When I expressed concern over getting down the icy waterfall, he told me an encouraging story:
“Last time I was here,” he said, “I saw a man skiing, from way up there.” He pointed up at the snowy jagged mountain backdrop. “If he can ski down that, you can climb down that waterfall.”
The Descent
There’s only one way to descend–the way you came. Climbing down the waterfall wasn’t too bad since I already knew how icy it would be and had gotten the hang of using the hand and footholds on the way up.
Now, if you’ve decided you’ve had enough hiking, you can continue back the way you came and skip the rest of the lakes. You’ll save ~2-3 miles that way. But I promised you Lake Haiyaha and the Emerald Lake loop, so now, let’s head to Lake Haiyaha!
OPTIONAL: MILLS LAKE DETOUR
If you’re looking to squeeze in one more beautiful alpine lake, you can add Mills Lake. Once you get near Alberta Falls, you’ll come to a junction. Look for the trail toward Mills Lake. It’s about 1.4 miles (roundtrip) from the junction and adds ~700 feet of elevation gain.

You’ll come to a sign that looks like this. Head toward Haiyaha.

Lake Haiyaha
Now we’re heading to the pretty, turquoise Instagram lake. Follow the signs that point to Lake Haiyaha, and you will find it. This is where the trail got tough for me. I was tired from the Sky Pond hike and starting to wonder why I’d chosen to tack on 3 extra miles. It felt like it took forever…

Lake Haiyaha was gorgeous, but a lot more bouldery than I thought it’d be. They don’t show you that part on Instagram. When you arrive, scramble over the boulders to find a good viewing spot. It’s a very pretty lake, so you may want to stay a bit.
It’s also become a popular lake in recent years, so you’ll likely see other people there. From here on out, the trail will become more crowded because you’re heading into the most popular area of RMNP. But on the plus side, the hiking gets easier.

Emerald Lake
Follow the signs, and you’ll find all the remaining lakes. Note: Emerald Lake is a .7-mile out-and-back detour. If you’re feeling tired and near the end of your rope, feel free to skip it. But it’s definitely worth seeing if you have the energy!

Dream Lake

Nymph Lake

Bear Lake
And finally, Bear Lake, the most visited lake in RMNP. It’s a short hike from the Bear Lake parking lot and is wheelchair accessible.
It seems that I always end up hiking in the dark, despite arriving early, and I got to Bear Lake just as the sun was going completely down.
The Takeaway: Is Sky Pond Trail worth doing?
For sure! No matter which route you take, it’s one of the best hikes in Rocky Mountain National Park.
FAQ: Sky Pond Hike
When’s the best time to hike the Sky Pond trail? Summer is the best time. Early fall is fine too. As I said, I did this hike in early October, and it was fine but cutting it close for my personal comfort level. The waterfall was icy enough. I would not risk it any later in the year. Also, in May, the waterfall will be icy. I would say, the closer you are to July, the better.
Can a beginner do this hike? If you’ve read my hiking adventures before, you know I’m no hiking expert. I’ve bumbled my way through many trails (and through much of my life) with kind of a “fuck it” philosophy. It’s worked pretty well for me so far. BUT this hike is pretty technical. Definitely don’t do this one as your first hike. I’d say it’s best for intermediate hikers.
Also, if you’re not adjusted to the altitude, don’t start with this one.
Do I have to take any of the exact routes you shared? Absolutely not! You can choose your own adventure. if you just want to hike to Sky Pond and skip Lake Haiyaha and the Emerald Lake Loop, you’ll save yourself a lot of miles. Or if you only want to skip Emerald Lake and see all the other lakes I mentioned, that’s fine too. You could even add Mills Lake if you’d like. Totally up to you.
Short on time? Do Lake Haiyaha instead!
If you’re not quite ready to take on Sky Pond, you can hike Lake Haiyaha instead and still see up to 5 alpine lakes!
What do you think? would you do this hike?
Let me know in the comments!